Transform your space with the laid-back charm of coastal farmhouse decor by adorning a dough bowl with an ocean-inspired medley of seashells and soft aqua hues. The versatility of dough bowls makes them an ideal canvas for creative expression, available in diverse shapes and sizes to suit your style. As you explore this post, please note that it includes affiliate links, reflecting my personal experiences and opinions. A small commission may be earned from clicks leading to purchases.
If you haven’t already, take a look at the ‘easy decorative balls’ I showcased last week – they perfectly complement my farmhouse-style dough bowl. For this coastal farmhouse dough bowl decor, I’m combining effortless crafting techniques with affordable supplies from Dollar Tree to elevate this stunning wooden dough bowl to new heights.
Shop My Favorite Dough Bowls Below
Unleash the thrifty crafter within by diving into this delightful dollar store project! With its speedy, easy, and budget-friendly nature, it’s a must-try. As an avid enthusiast of all things DIY on a dime, I’m excited to share this find with you. If you’re keen to get creative, make sure to swing by your local dollar store and check out their summer decor section – dubbed the ‘crafters square’ in some locations.
This special area is stocked to the brim with an array of craft supplies, making it a treasure trove for crafty enthusiasts like yourself.
Supplies for Coastal Farmhouse Decor Dough Bowl
All supplies are from Dollar Tree except the Dough Bowl
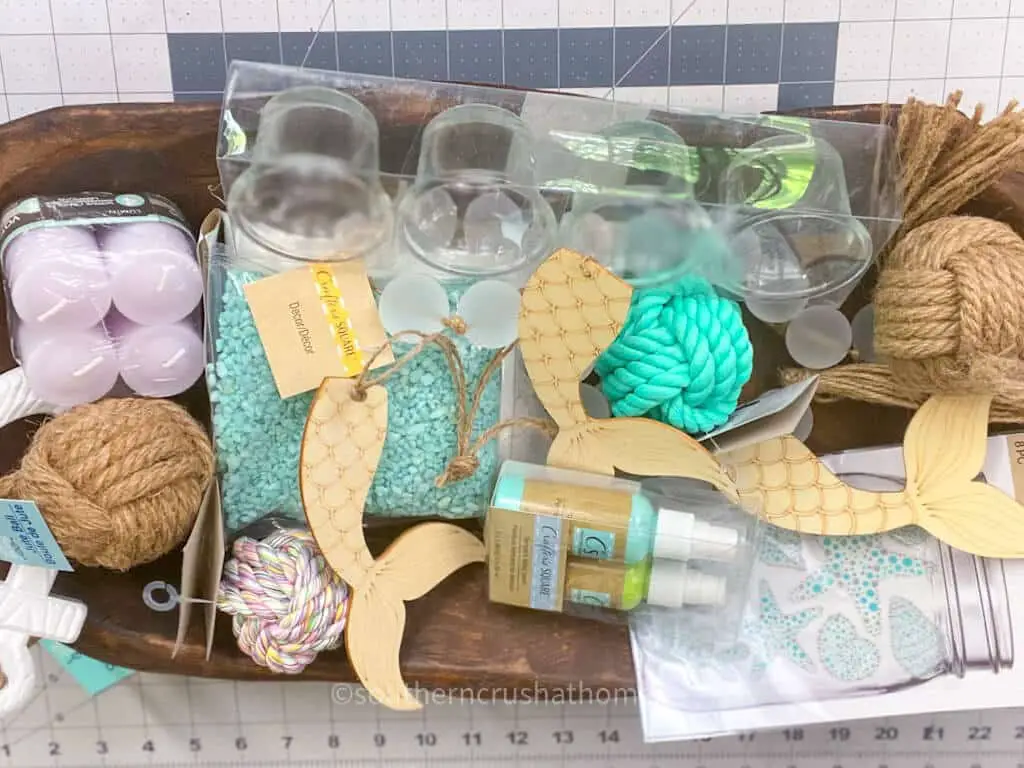
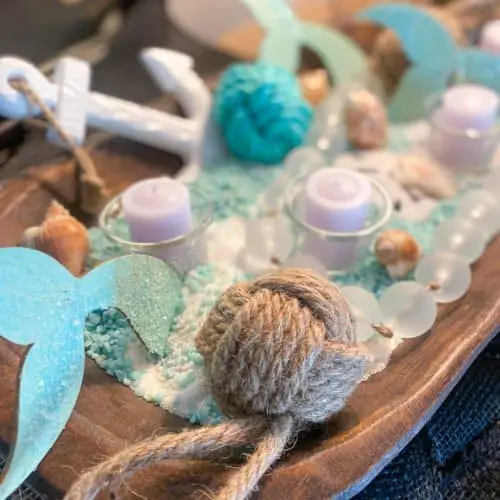
Create a coastal-inspired treasure trove with Dollar Tree’s Wooden Mermaid Tails, Seashells, Votive Candles and Holders, Assorted fillers like sand and crushed stones, Jute and Rope Balls, and Coastal Stickers. Add some rustic flair with Dough Bowl to complete the look.
Coastal Farmhouse Decor Dough Bowl Instructions
Incorporating coastal grandmother, coastal grandma, and coastal granny elements into your DIY project is an absolute blast. This straightforward guide makes it easy to unleash your creativity while having a good chuckle along the way.
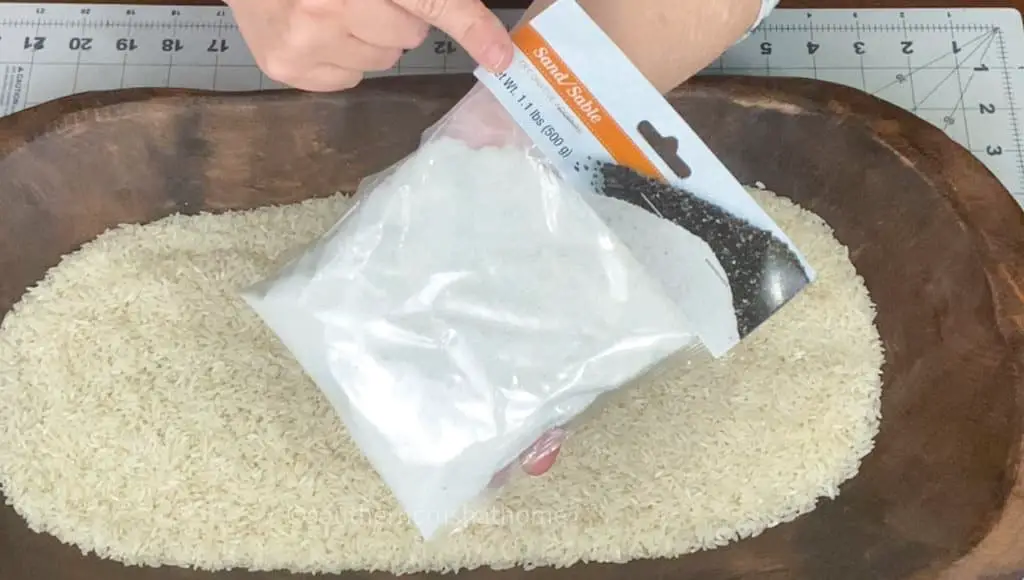
Step 1. Add parchment paper to the dough bowl

To ensure effortless removal, I start by lining my surface with parchment paper. This simple step prevents any baked goods from sticking and makes cleanup a breeze. Next, I create a template tailored to the size of my bowl using a cutting tool or a knife. By doing so, I’m able to achieve uniform results and avoid any pesky crumbs or messes.
Step 2. Add rice to the bowl
To enhance the overall visual appeal of your miniature landscape, consider starting by placing a thin layer of rice at the bottom of your paper or surface. This simple trick provides a foundation for the subsequent layers of sand and small stones to adhere to, allowing for a more even distribution and a more realistic representation of terrain features.
Step 3. Add your sand and stones
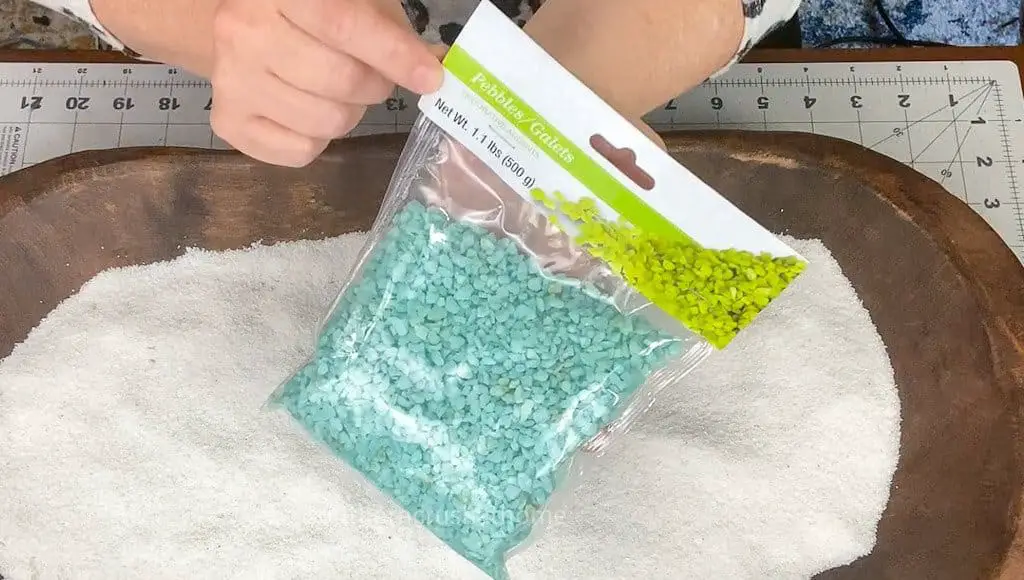
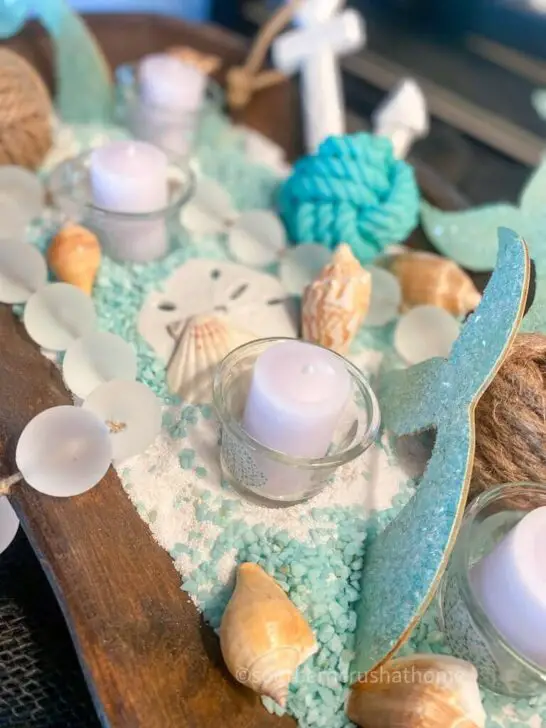
As you begin the process, carefully pour the mixture of sand and crushed stones into your dough bowl. Take a moment to appreciate the unique beauty of the aqua-hued crushed stones glistening among the golden sand, a visually striking contrast that adds an air of sophistication to the overall appearance.
Step 4. Paint the Mermaid Tails
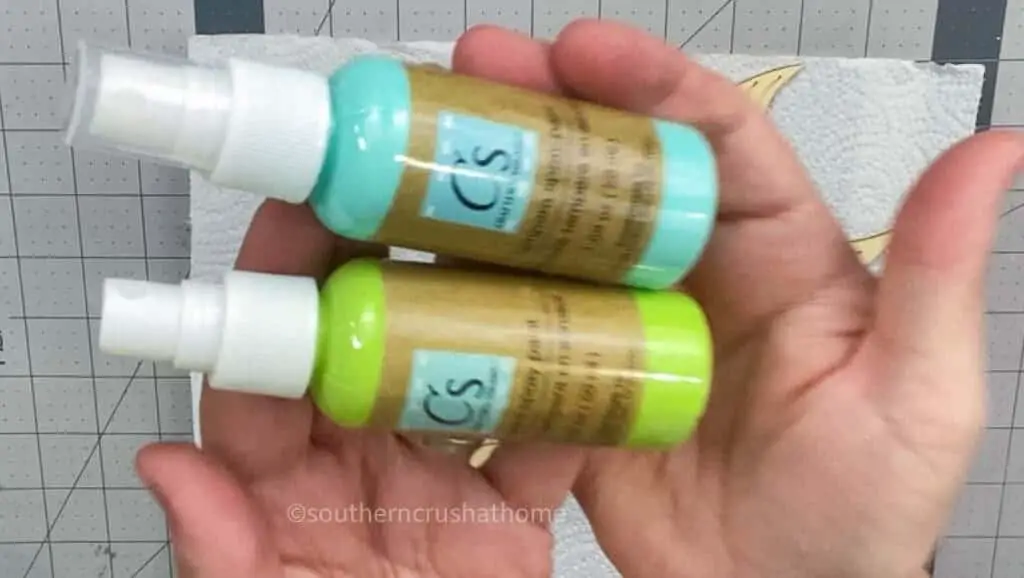
Discovering the perfect hues for your mermaid-inspired creations, I stumbled upon an unexpected treasure at Dollar Tree – Crafters Square’s impressive array of spray paints. The soft aqua and lime green tones immediately transported me to a summer spent by the ocean. These vibrant colors are tailor-made for crafting mesmerizing mermaid tails that shimmer and shine. What’s more, the sprays themselves are incredibly easy to work with, thanks to their convenient bottle design.
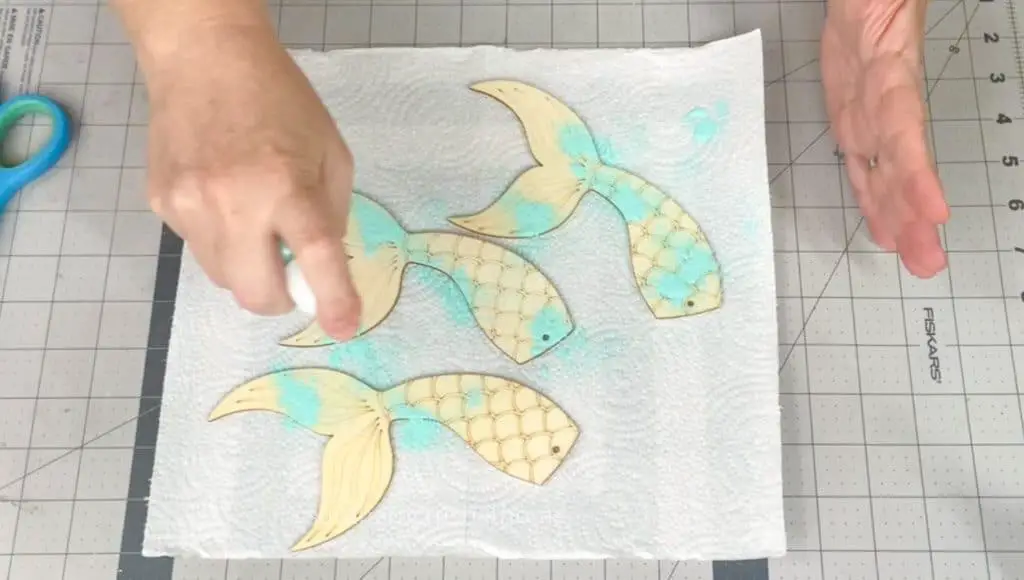
Step 5. Blend paint with wet wipes
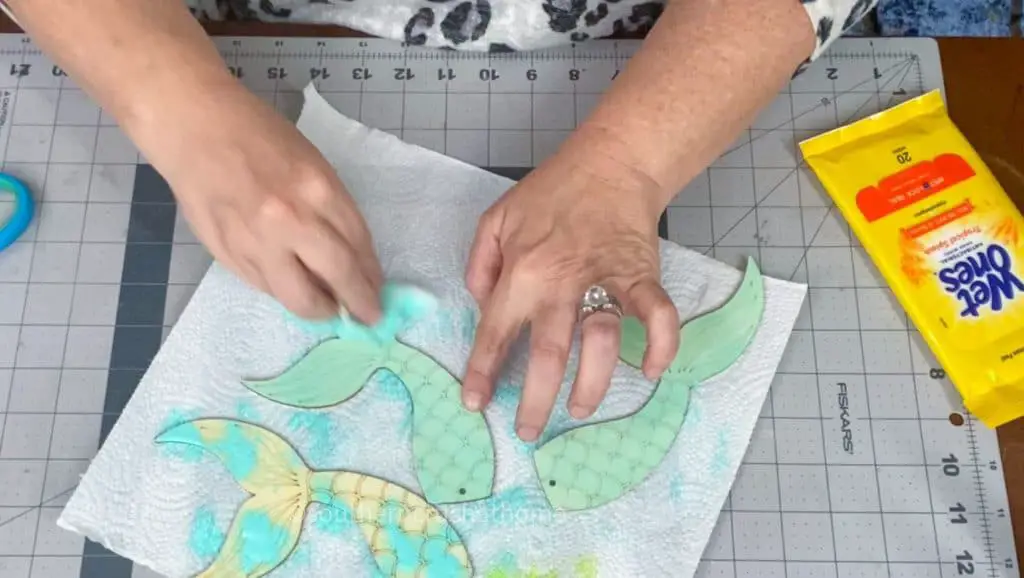
To add a pop of color to your mermaid tails, simply spritz a variety of hues onto the fabric. Next, use wet wipes (another affordable find from the dollar store) to gently blend the colors together, creating a unique and eye-catching design. This process is reminiscent of the classic sponge-painting technique that many of us fondly recall.
Step 6. Add Diamond Dust
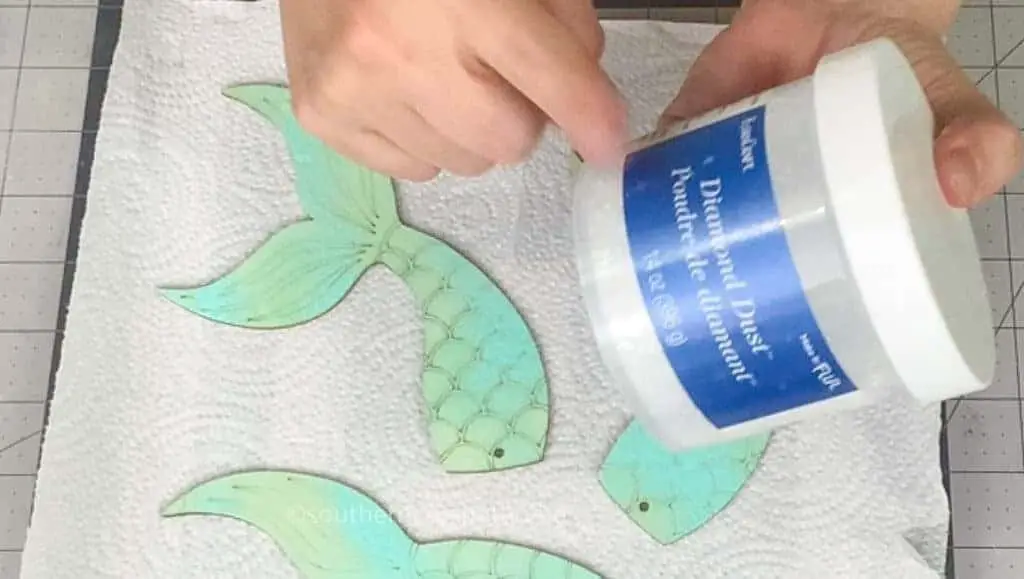
Infusing a touch of magic into the mystical world of mermaids, we find that a pinch of diamond dust can work wonders. By sprinkling this radiant powder onto their shimmering tails, the sparkle becomes an integral part of their underwater aura, taking on a mesmerizing quality that’s simply irresistible. The resulting visual spectacle is nothing short of enchanting, as if the very essence of the sea has been distilled into a glittering essence that radiates joy and wonder.
Step 7. Add stickers to the votive
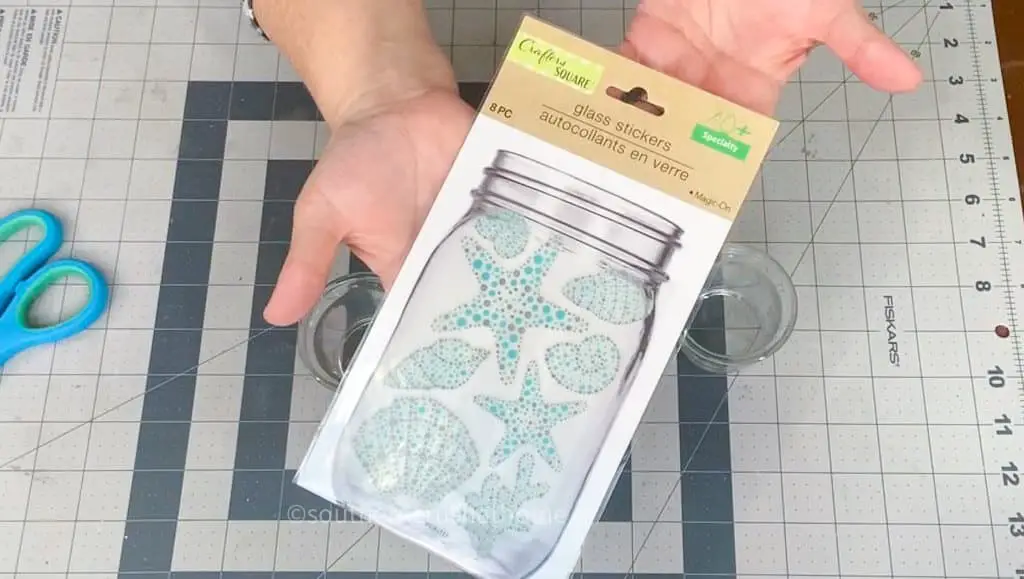
Elevate the look of your candle votive holders by adding a touch of coastal charm with assorted glass stickers. Simply place them on each holder, and you’ll instantly transform plain glass into a beautiful, ocean-inspired accent that adds visual interest and personality to any room.
Step 8. Add jute and rope dog toys
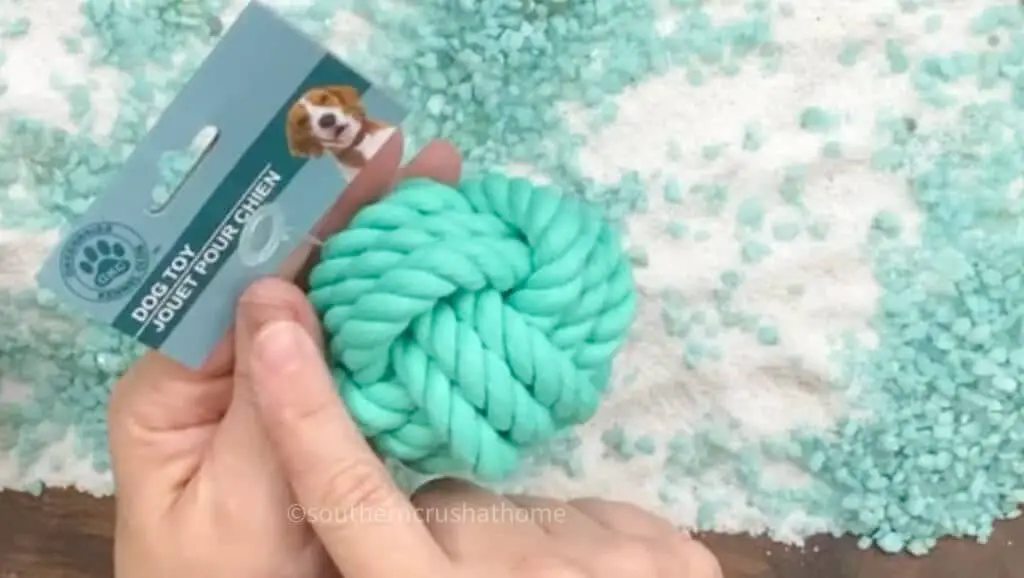
Discovering creative ways to decorate with everyday items has become my latest hobby, and I’m thrilled to share one of my favorite finds – using dollar store dog toys! Who would have thought that these humble trinkets could be transformed into a beautiful coastal wreath? In fact, this project uses not just one, but two different styles of dog toys. If you’re looking for a quick and easy DIY project, simply fill a bowl with a few decorative balls in various shapes and sizes, and voila!
You’ll have a delightful centerpiece that’s sure to impress.
Step 9. Arrange candles
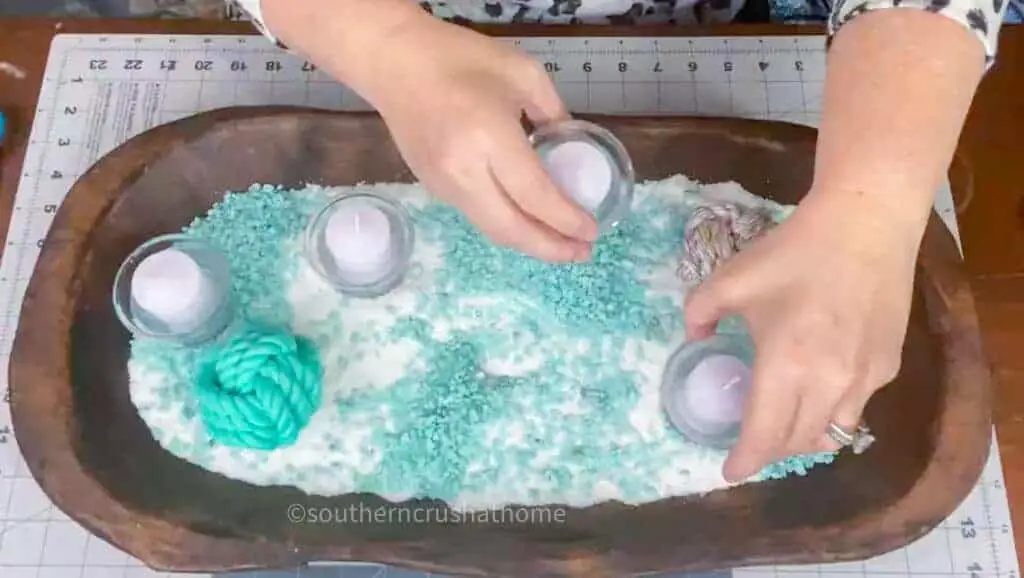
As you prepare to shape the dough, scatter a handful of candles around the perimeter of the bowl, ensuring they’re not deliberately placed in any particular pattern. This subtle touch will add an element of whimsy and visual interest to your presentation, making it feel more organic and less contrived.
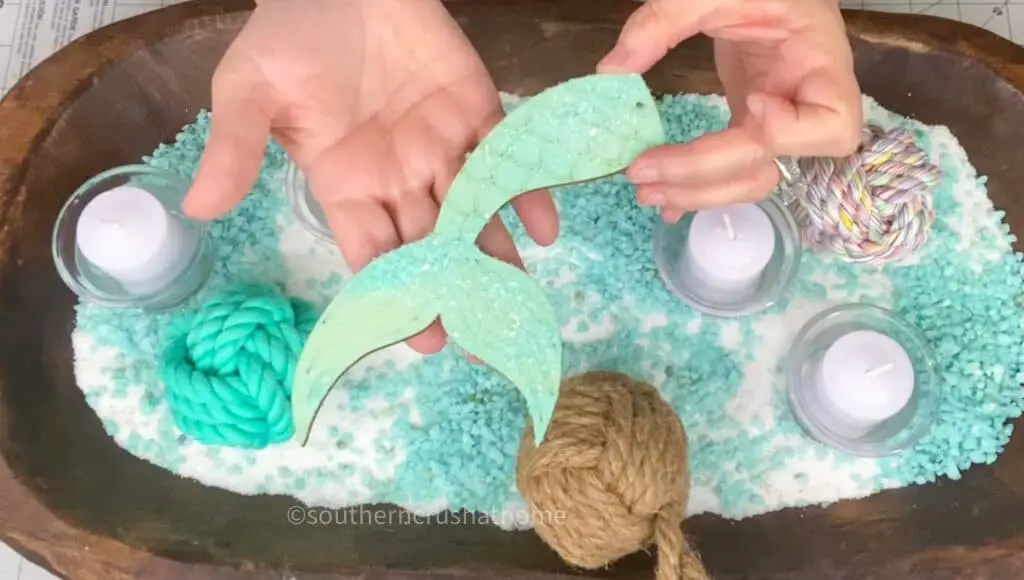
Step 10. Add mermaid tails
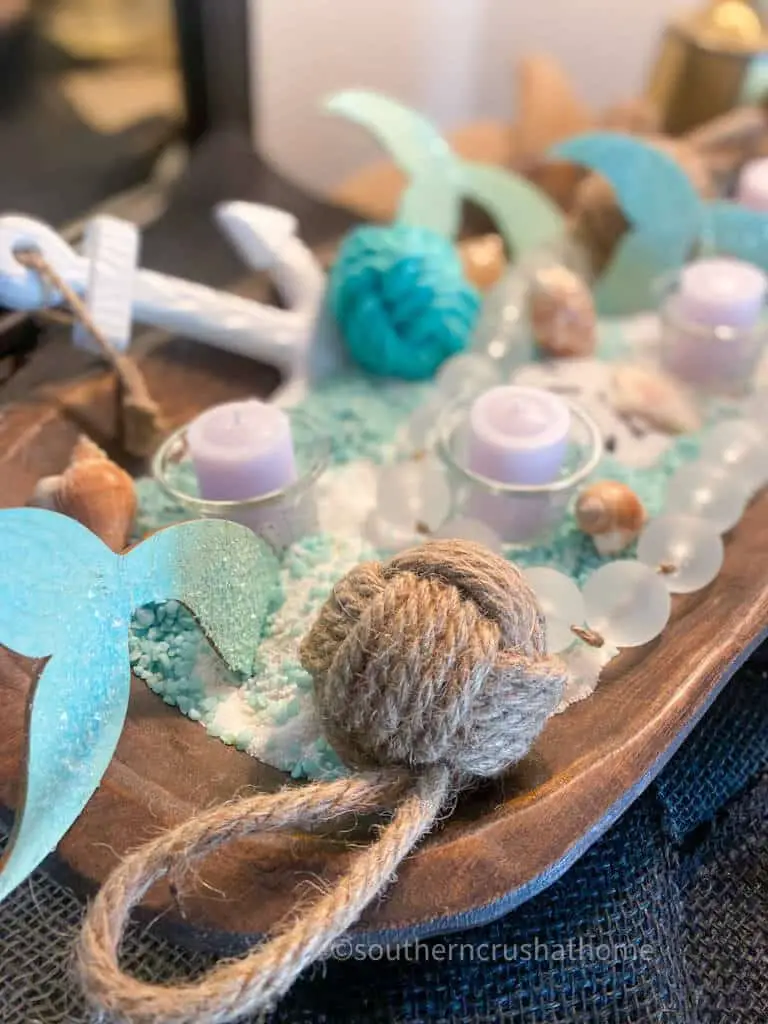

With the drying process complete, it’s time to arrange your newly crafted mermaid tails within the designated bowl. Their sleek, dry appearance adds a unique visual element to the display, subtly elevating its overall aesthetic through the introduction of height and dimension.
Step 11. Add seashells
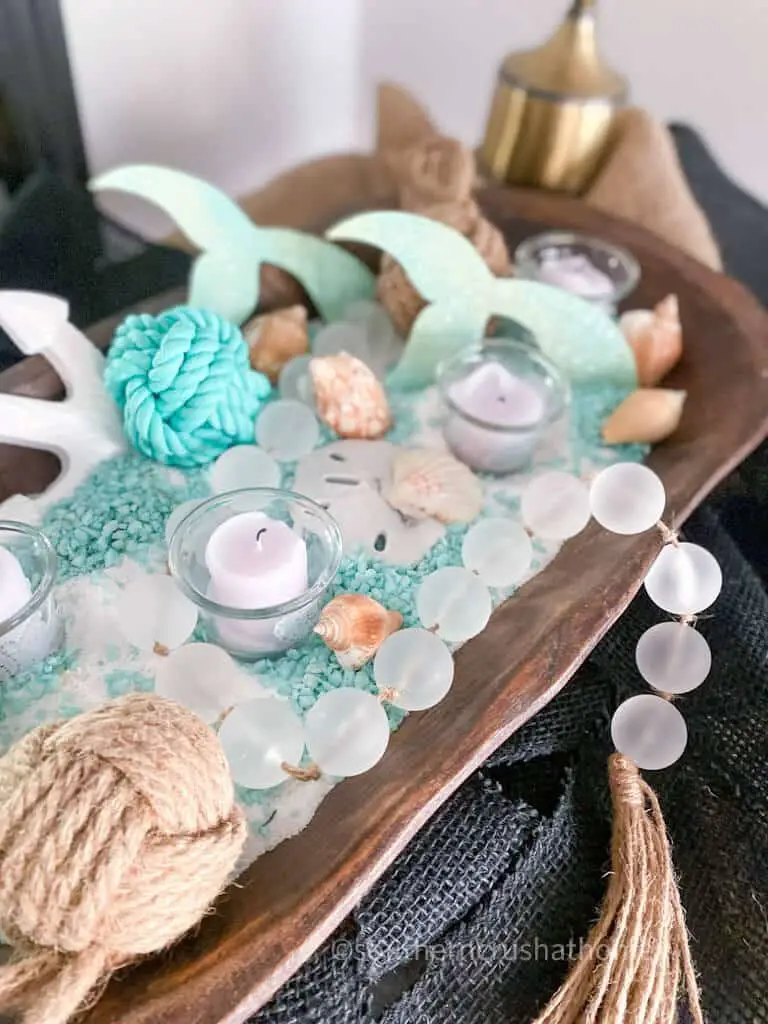
As you prepare your dough, scatter a variety of seashells around the dough bowl to add an element of whimsy and connection to nature’s beauty. Consider collecting these shells during your next beach trip or foraging excursion to bring a touch of the coast into your baking experience.
Step 12. Layer glass beads
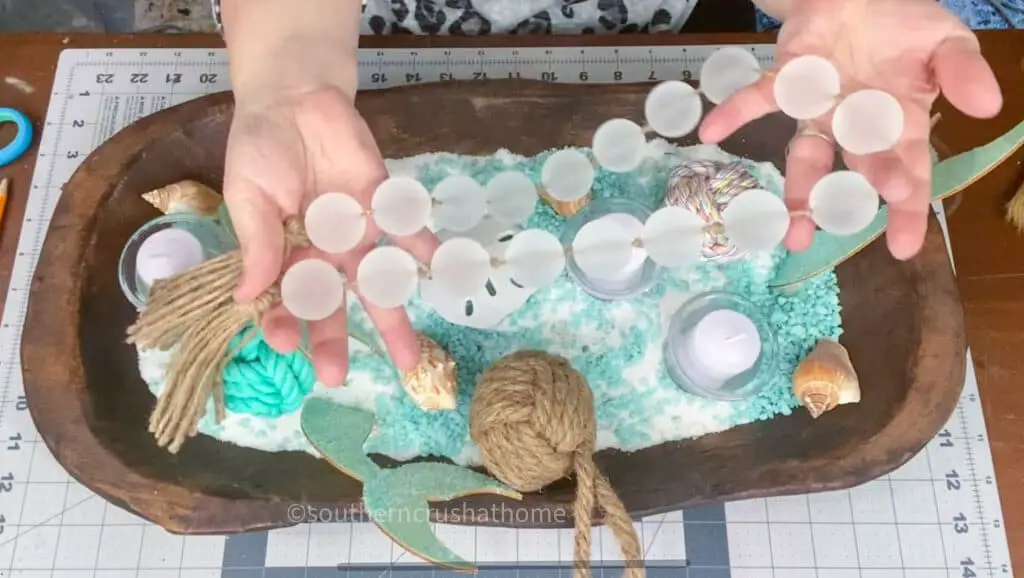
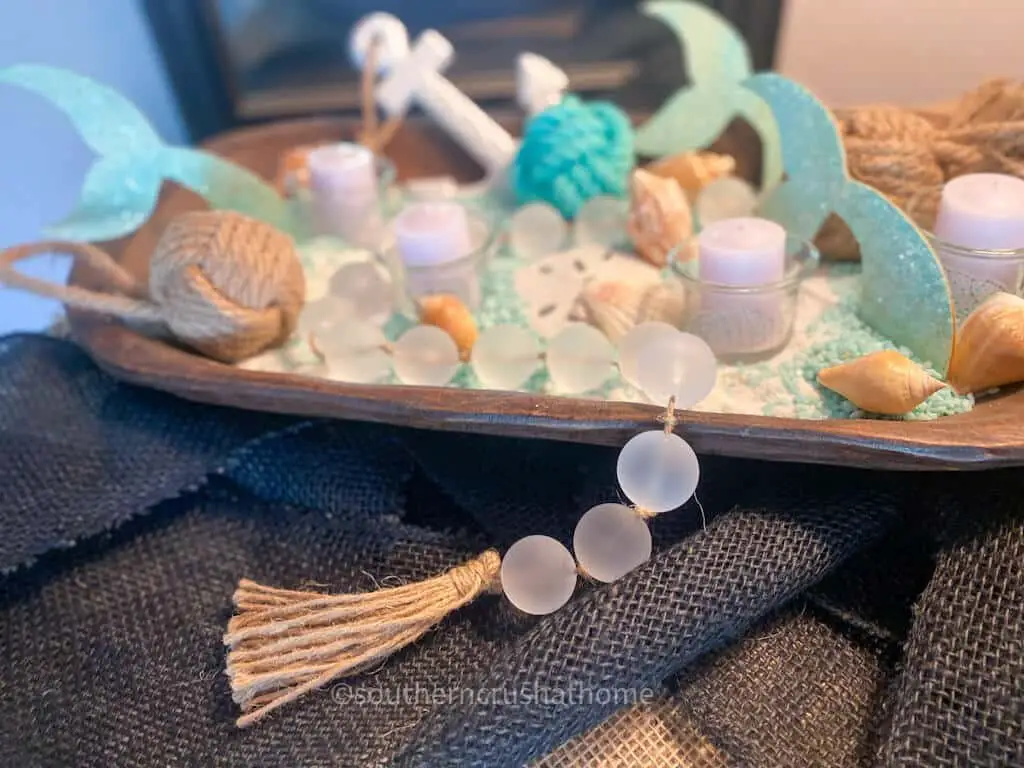
I recently stumbled upon some gorgeous glass beads that caught my attention, and if you’ve been following me on Instagram, you might have already caught a glimpse of them. In person, they’re even more stunning! While glass beads are certainly a lovely addition to your coastal farmhouse decor, you can also opt for wood beads or jute balls – the versatility is one of their best features. And that’s all there is to it…
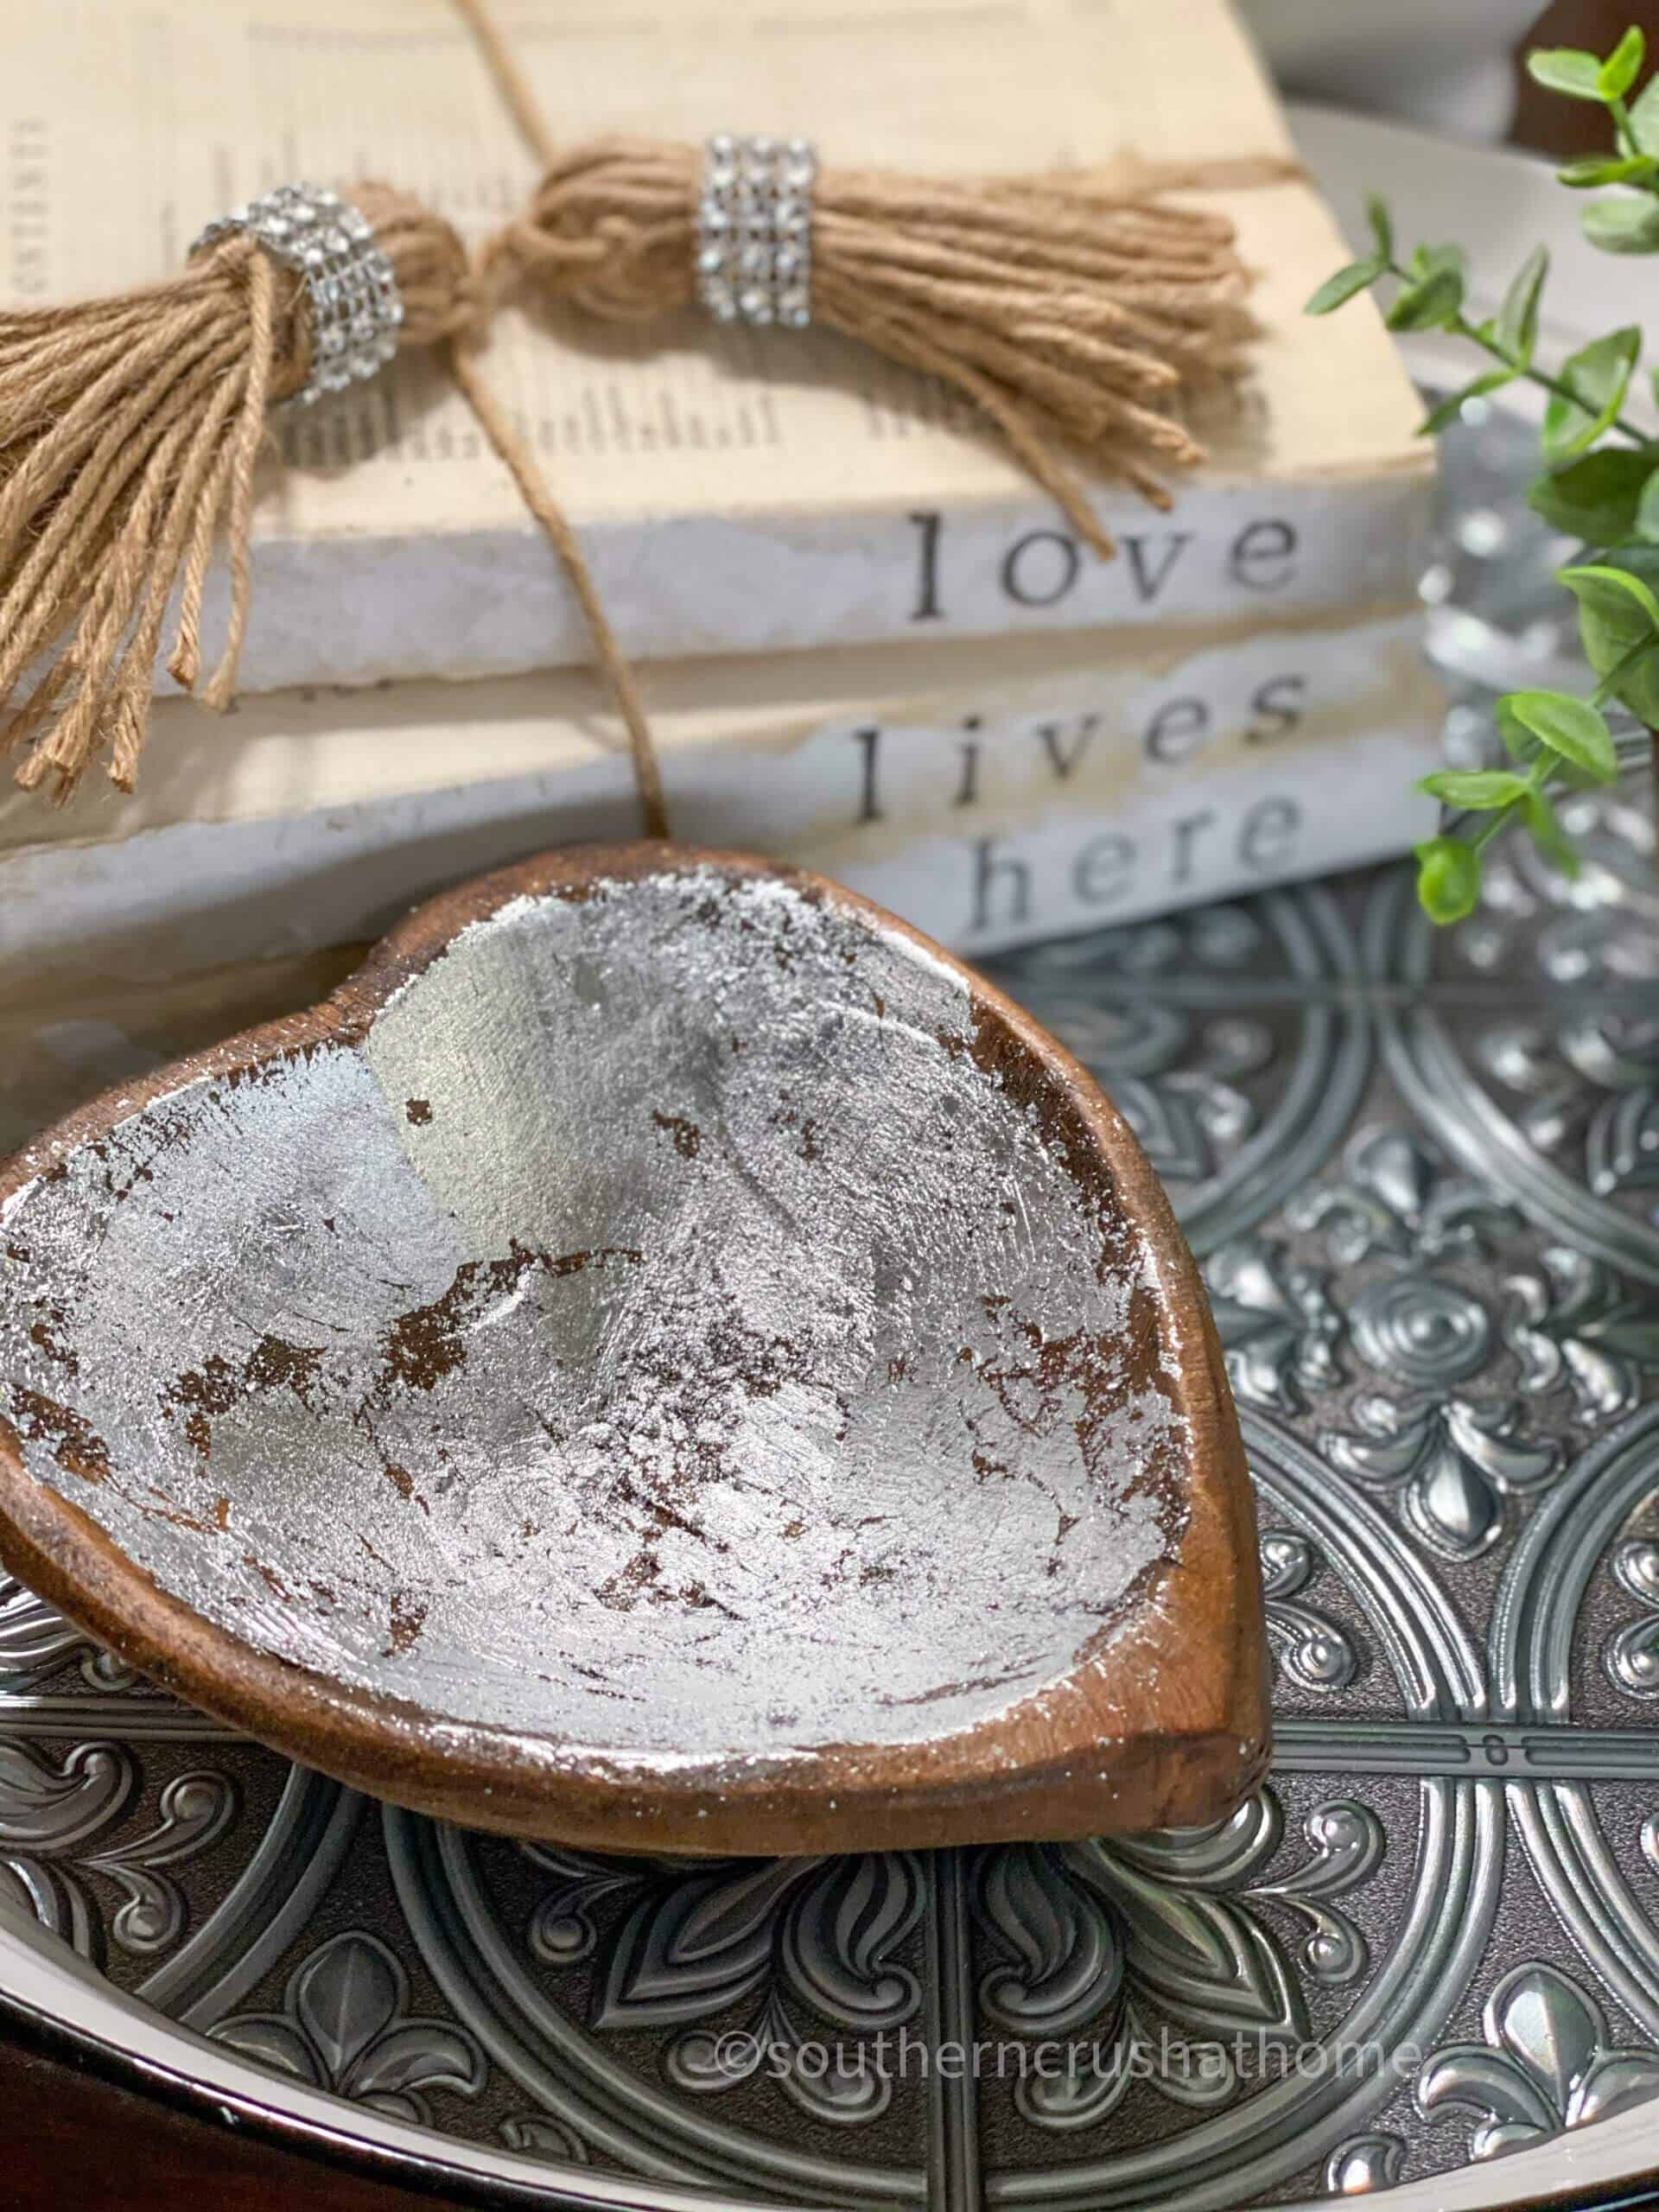
simply add some ambient lighting with a candle, pour yourself a favorite drink, and enjoy the warm ambiance. Don’t forget to save this post for later by pinning it! As someone who loves decorating dough bowls, I’m excited to share my enthusiasm with you. Of course, if you’re looking to add a touch of glamour to a wood bowl, updating it with silver leaf is always an option – and I’ve got a tutorial on that process HERE. Thanks for stopping by, and I hope you have a wonderful summer!
Other Fun Summer Crafts:
Transform your outdoor space with these creative and practical DIY projects! From a watermelon planter that adds a pop of color to your patio, to a pool towel rack made from inexpensive materials at Dollar Tree, you’ll find inspiration in this collection of 7 DIY ideas. Whether you’re looking to store BBQ tools or add some ambiance with outdoor lighting, these easy-to-make solutions will elevate your summertime fun.
Coastal Farmhouse Decor Dough Bowl
Transform your dough bowl into a stunning coastal farmhouse centerpiece by leveraging the affordability and versatility of dollar store decor. With just a few simple steps, you can create a beautiful display that captures the essence of a seaside retreat without breaking the bank.
Materials
Immerse yourself in the coastal charm with a curated selection of ocean-inspired treasures. Delve into the depths of our treasure trove, where you’ll discover an assortment of mermaid tails, shimmering seashells, and soft votive candles accompanied by their elegant holders. The gentle lapping of the waves is captured in the delicate texture of sand and crushed stones, while jute and rope balls add a touch of rustic whimsy.
For those who love to decorate with coastal flair, we’ve got you covered with our range of stickers, perfect for adding that finishing touch to your ocean-themed decor. And for the ultimate home decor enthusiast, we offer a beautiful dough bowl, perfect for showcasing your favorite treasures and creating a warm, inviting ambiance.
Instructions
To create an enchanting underwater scene, start by lining your dough bowl with parchment paper. Atop this foundation, add a layer of rice to represent the ocean’s sandy floor. Next, slowly pour in the sand and crushed stones, allowing them to blend together organically. Meanwhile, infuse your mermaid tails with color by spraying a mix of paint hues onto their surface and then blending with wet brushes.
Finally, sprinkle a pinch of diamond dust on top of the still-wet paint to catch the light like shimmering ocean mist. As you arrange your candles, add painted mermaid tails, seashells, and glass beads to bring depth and dimension to the scene. To complete the look, adhere coastal glass stickers to each candle votive holder and nestle a selection of decorative balls amidst the arrangement.